Teachers familiar with the Everyday Math Program are familiar with the Baseball Multiplication Game played to help students master basic multiplication facts. Players toss two dice, multiply the numbers, then enter the product to score. According to the table, that product earns a single, double, triple, home run or an out. Students will enjoy playing against the computer and practice multiplication facts at the same time.
Try Baseball Multiplication online at the Everyday Math Games Site.
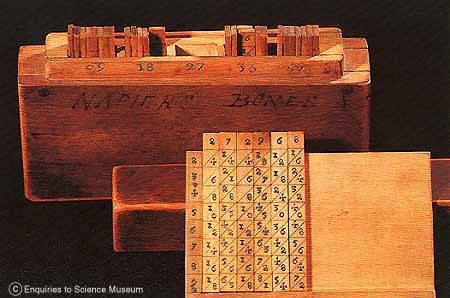
Once students are comfortable with lattice multiplication, Napier's Bones is a great enrichment activity. Students order the bones as they would write the problem in the lattice. They are then able to read the answer without any writing. It's magic!
Download the Napier's Bones template that students may cut apart to create the bones. The file contains three different versions including blank bones that students fill in to create the bones, developing a richer understanding of the magic of the bones. Copy the handout on card stock and laminate before cutting to create more durable classroom sets. Teachers may also elect to create a transparency of the bones and cut apart for use on the overhead.
Interactive Napier's Bones:
This site allows students to manipulate the Napier's Bones to multiply large numbers and check the accuracy of their answers. Simply click on Get Multiplication to start, then click the appropriate bones to add them to the problem on the left. Students then read the correct answer, post it in the answer box and click Check answer.
Note that the site may also be used to do any problem. Simply click Reset, then click on the bones needed, and read the answer. This would be a powerful introduction to Napier's Bones using a whiteboard or projector.
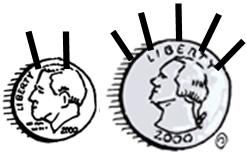
Students draw antennas on coin pictures to represent the value. Each antenna is worth 5 cents. This means a dime has two antennas, a nickel has one antenna, a penny has no antennas, etc.
This strategy capitalizes on students' strength in counting by fives. They simply point to each antenna as they count by 5s, then count on by ones to include any pennies. This method is also efficient because students do not need to sort and reaarange coins; they simply draw antennas on coins in the order given.
This method is especially effective for K-2 regular and special ed. students who will eventually outgrow the need for antennas.
NOTE: some teachers call the antennas "hairs" and talk about the penny as "bald" because it has no hair. Whatever works for you and your students is the best strategy.
This algorithm works well for students who are developing multiplication fact fluency. Students may begin using a template to solve multiplication problems, but they quickly learn to draw their own lattice matrix to solve problems. Students love the method and it is very successful with both whole numbers and decimals. Teach students this multiplication algorithm as one of many different algorithms they may elect to use. Students will very quickly learn to multiply large numbers, using basic multiplication facts and addition/regrouping skills.
Procedure:
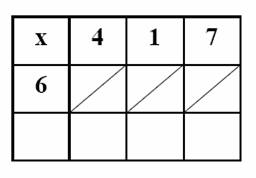
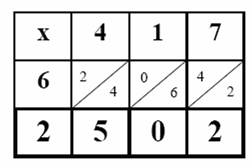
- Student writes the problem in the grid (e.g. 6 x 417).
- Student then writes the answer to each single digit multiplication in the appropriate square.
- The tens digit is placed above the diagonal; the ones digit below the diagonal.
- When all squares have been completed, the student sums the numbers between each set of diagonals, and writes the sum at the bottom of the grid. NOTE: If the sum is greater than 10, regroup the ten to the next diagonal to the left.
- The student can now simply read the answer from left to right and insert commas, as appropriate.
For a complete overview of this method, see Cool Math's explanation of Lattice Multiplication to view the step-by-step procedure. Take a cue from the site's explanation and use colored markers when introducing this algorithm to students on the overhead or whiteboard.
Practice:
Templates: Three different templates are included for Lattice Multiplications. Templates are designed to be used in sheet protectors. This strategy allows students to use dry-erase markers and re-use the same paper for many multiplication problems.